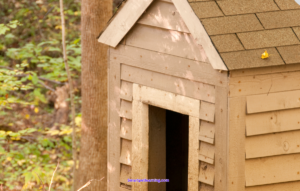
Let’s be honest for a second. One of the most common—and honestly, biggest—mistakes people make when building a dog house is placing it directly on the ground. Sure, it’s easier. Just set it down and call it done.
But over time? Your dog pays the price.
We’re talking about:
- Damp flooring
- Cold temperatures
- Poor airflow
- Faster wear and tear
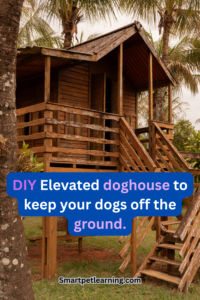
That’s exactly why raised DIY dog houses that keep dogs off the ground are such a game-changer. By lifting your dog’s house just a few inches, you completely improve comfort, durability, and protection from the elements.
And the best part? You don’t need advanced skills to build one.
Let’s break it all down.

Why Raising a Dog House Is So Important
A doghouse sitting directly on the ground will:
- Trap moisture
- Absorb cold from the earth
- Limit airflow
- Promote mold and rot
Even if the structure itself is solid, the ground underneath is still
- Damp
- Cold
- Unstable
The Real Benefits of Elevation
Raising your doghouse improves three critical things:
1. Keeps Your Dog Dry
No direct contact with wet ground means no damp floors or muddy buildup.
2. Improves Airflow
Air circulating underneath helps the following:
- Reduce moisture
- Minimize odors
- Keep the space fresh
3. Adds Insulation From Cold Ground
Cold transfers from the ground upward. Elevation creates a buffer between your dog and that chill.

How High Should You Raise a Dog House?
Don’t overthink this.
- Small to medium dogs: 4–6 inches
- Large dogs: 6–12 inches
This gives you:
- Proper airflow
- Protection from ground moisture
- Stability
Materials You’ll Need
Keep it simple—you don’t need anything fancy.
Base Materials:
- Pressure-treated wood (frame)
- Plywood (floor and walls)
Elevation Materials:
- Wooden legs or blocks
- Bricks or concrete blocks (optional)
Additional Materials:
- Screws or nails
- Waterproof sealant
- Insulation (optional but highly recommended)
Step-by-Step: Building a Raised Dog House
1: Build the Base Frame
Create a rectangular frame using wood. This is your foundation.
2: Attach the Floor
Secure plywood to the frame.
Make sure it’s smooth—no splinters or rough edges.
3: Elevate the Structure
Add legs to each corner or place the frame on bricks/concrete blocks.
4: Build the Walls
Use plywood or boards.
Include ventilation holes for airflow.
5: Add a Slanted Roof
Skip the flat roof. A slight angle allows the following:
- Rain runoff
- Less water buildup
6: Apply Sealant
Use a pet-safe waterproof sealant to protect the structure from weather damage.
Don’t Skip Insulation
Elevation helps—but insulation takes comfort to the next level.
Where to Add It:
- Floor
- Walls
- Roof
Best Options:
- Foam boards
- Reflective insulation
Why it matters:
- Keeps your dog warm in cold weather
- Keeps the interior cooler in the heat
Flooring Tips for Comfort
Your dog isn’t just living in the house—they’re lying on the floor.
Good Options:
- Raised dog beds
- Weatherproof mats
- Moisture-resistant bedding
Avoid:
- Bare wood
- Materials that absorb water
Weatherproofing Matters
A raised house is great—but it still needs protection from the elements.
Add:
- Roof overhang
- Door flap
- Wind barriers
This helps prevent:
- Rain is entering the house
- Cold drafts
Placement Is Just as Important
Even a perfectly built dog house won’t perform well in the wrong location.
Ideal Placement:
- Slightly elevated ground
- Shaded area
- Good drainage
Avoid:
- Low, flood-prone areas
- Direct, constant sunlight
Choosing the Right Size
Don’t forget sizing matters too.
Consider:
- Your dog’s breed and size
- Coat type (short-haired dogs need more insulation)
- Climate
Rule of thumb:
Your dog should be able to stand, turn, and lie down comfortably but not have excessive empty space.
Common Mistakes to Avoid
1. Not Raising It Enough
Fix: Stick to the 4–12-inch guideline.
2. Skipping Waterproofing
Fix: Always use a weather-resistant sealant.
3. Using Cheap Materials
Fix: Invest in quality where it matters (frame, base, sealant).
4. No Ventilation
Fix: Add small, well-placed airflow openings.
Cost vs Value
You don’t need to overspend—but you shouldn’t cut corners either.
Spend More On:
- Structural materials
- Elevation support
- Weatherproofing
Save On:
- Decorative features
- Non-essential extras
Is It Really Worth It?
Yes—100%.
A raised doghouse:
- Keeps your dog more comfortable
- Lasts longer
- Requires less maintenance
It’s one of the simplest upgrades with the biggest impact.
Final Thoughts
Building a dog house isn’t complicated.
But building one the right way—with elevation, airflow, and protection—makes all the difference. When you raise your doghouse off the ground, you’re not just building shelter…You’re building with purpose.
And your dog will feel it every single day.
Save Pin for later.

- Dog Nutrition Guide for Better Health and Energy - May 23, 2026
- How to Keep Your Cat Healthy and Active at Home - May 17, 2026
- Dog Health Tips for Indoor and Apartment Living - May 17, 2026